Ford Expedition Front Brakes - Removing Stuff
This is the easy part, get some gloves as brake dust and dirt is messy. Start with jacking up your car with jack stands. Do it safely as you will be under the fender and you don't want to get crushed and end up with you on a YouTube Video. Be safe! If you do NOT have an impact wrench it's a good time to crack loose the lug nuts before the wheel is off the ground.
Get the lug cover off and remove the lugs, then take the tire off, and then begine to start taking things apart. Steps outlined below and in the next couple of pages.
Pull the Lug Cover Off the Wheel
Carefully with a screwdriver pry up the lug cover on one side. When it gets enough to hold it with your figers pull it out. If you have trouble you can go to the opposite side of the cover where their is another slot to pry. Don't be bashful, just rip it off.
Remove Lug Nuts
If you don't have an impact wrench, you should have cracked the lug nuts before jacking the tire off the ground. In any case, get them lug nuts off and get the tire out of the way. Note I had no Metric impact sockets at home, but a 13/16" fit perfect, better then the 21mm that is normally used.
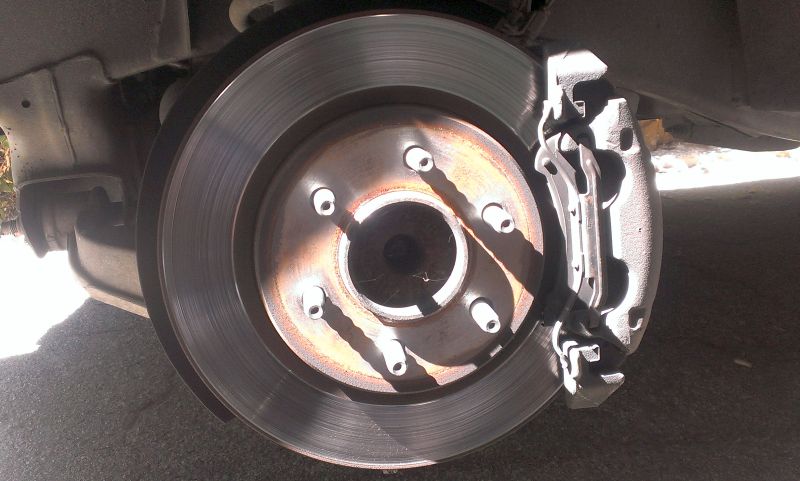
Expedition Caliper and Rotor Exposed
This is what you see when you pull the wheel off. Don't get nervous, it's pretty simple except for that spring clip on the front of the caliper. Take a good look at it and remember how it fits or you will have to run back in to look at the picture again.
Remove Dust Caps on Caliper Bolts
Remove the pushed in dust caps on the back of the caliper. Their are 2 of these, one on the top, one on the bottom. They are the larger of the set and you can see the smaller dust covers in the lower right. These will NOT need to be removed. Under the dust cap is a Torx T45 bolt. In some model years they may be a T40. These are the bolts that the floating caliper slides on. Pull these out with a small socket. If rusty, get a bigger socket...
Torx T45 and Behind Caliper with Dust Cap Removed
Hopefully you know what a Torx T45 is, if not the left hand side of the picture is a shot of what the bit looks like. You can get a set here at Amazon if you need one. These are used a lot on newer cars, so get a good set if you intend to use them a lot. The picture on the Right is shot from behind the caliper and shows the rubber boot around the slide bolt.
Removed Caliper
Once the 2 T45 Torx bolts are removed you can pry a screw driver through the top of the brake caliper and between the rotor to help spread the pads a bit and loosen the caliper off the rotor. If you intend on reusing the rotor be careful not to gouge it up. The caliper should lift off. Once off set it on the top of the heat shield as shown. Do not use the rotor for holding it up as that is coming off. Make sure it's stable you do not want it falling or hanging off the brake line. Tie it with a bungie if you are nervous.
Removing Pad in the Caliper
Now carefully balance the caliper on the rotor and with a long flat blade screwdriver pry the pad away from the pistons. Be careful of the dust boots when doing so. The pad is held in with 3 spring clips in each of the 2 pistons. It will start to come out, but you really have to give it a pop to make it release. NOTE : if you do not have a slick piston compressor, it may be easier to compress both pistons with the pad in the caliper. You can use a large C-Clap right around the caliper from the pad to the back of the caliper. Just slowley compress both pistons into their bore. If you brake fluid was full to the top you will start to realize that it's over flowing right about now, but the likely hood is low but worth a check as the fluid will rise a bit. The last NOTE is that right in the middle of the pad their is an attachment for a WTF Spring. You can put you hand on the back of the caliper and push down and pop it out. It only hurts for a second when it pops out...
You can Navigate to any of the pages in this project by the BELOW drop down menu or use the NEXT or PREV links
Compressing Both of the Caliper Pistons
To get the new (THICKER) pads over the rotor the pistons must be fully pushed into the caliper. As mentioned if you do not have a slick tool like this you can use a C-Clamp BUT leave in the pad or use a block of wood or metal to make sure both pistons are pressed in together. Some of the simpler tools might work too some HERE might also do the job, just look for the ones with a flat plate that will hit both pistons.