Ford Explorer Rear Brakes - Caliper Work
This pages shows work related to the caliper, removing it, removing pads, compressing the piston, etc. It's pretty simple work. Get some gloves on and get busy. About the only special tool you will need is the piston compressor, but a couple of screwdrivers and a block of wood can work just as well. As always keep an eye out for broken, cracked or badly rusted parts.
If replacing the rear rotors you must RELEASE the Emergency Brake before pulling the rotor off.
Caliper lift up and off
As you can see the caliper can only be lifted off in one direction. I mentioned about the ears of the calipers you can see that one direction will allow it to be lifted as shown. You will have to look and see which side will allow this and lift from that side. Again make sure you don't hang the caliper by the flex line.
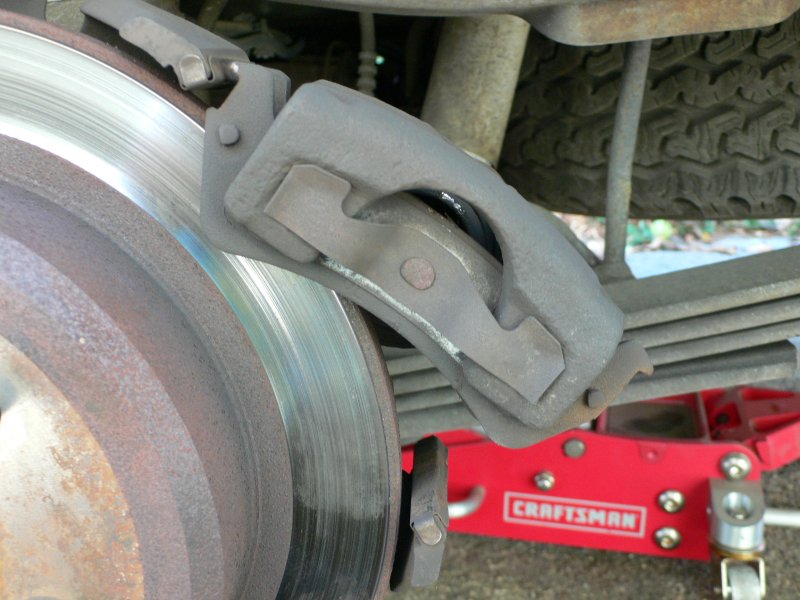
Supporting the Caliper
The rear calipers can be supported by the leaf spring. Make sure you don't twist up the brake line, and that it does not fall off the spring while working on it. A good box or milk crate can be a support as well.
Caliper Slides
Not sure what to call these, but you should have one on the top and one on the bottom of the caliper bracket. If you lose them off to the auto parts store or worse dealership for replacements. Wipe these off and put a thin layer of the caliper grease on them. No blobs, just a very thin layer. If these are loose you can give them a squeeze with your fingers to bend them in and they will stay put while installing the caliper. If you haven't done so pop on the new rotor!
Explorer new rear Rotor
This is the rotor installed. If the Emergency Brake shoes looked OK you should just be able to pop this right on. I usually wipe the hub clean and apply a light coat of caliper grease to keep things from rusting. Make sure you CLEAN the rotor and remove ANY goop or oil the manufacturer puts on for shipping.
You can Navigate to any of the pages in this project by the BELOW drop down menu or use the NEXT or PREV links
Remove the Brake Pads
Using a screwdriver pry up the spring clip and lift out the outer pad. You may have to fiddle with it a bit, but you need to pry the spring off and then do the other side the same way. This will allow you to press the pad toward the center of the caliper and remove it. Again NOTE the side and style of the ears on the edges of the pads. After removing the outer pad, carefully pry out the inner pad. It is held in by a spring clip that is pushed into the brake piston. Be careful not to mess up the seal on the piston.


Compressing the Rear Caliper Piston
Their are a few ways to get the piston fully seated, easy way is use a tool. I used an expensive tool from OEM Tools, which I'm guessing is just like any import tool company, cost was $6 bucks shipped from Amazon. You could also have used a few other style of tools to do it with some of these tools on the Brake Tools Page, or lastly just put keep the old pads in and use a screwdriver to pry the piston back into the housing. Single piston calipers are easy to get the piston back in. Also prior to pushing the caliper piston in, check your break fluid to see if it will overflow when pushing it back in. You will need a bit of room in the master cylinder. Unless someone topped off the brake fluid since the last brake job you should be OK.
Also it's a good time to check the bolt holes and rubber boots for the caliper mounting. These should be clean an rust free. If boots are cracked, likely a good time to pick up a kit for them. I typically remove the boots (carefully) and re-lube with disc brake lube so the caliper slides nicely on them.
Caliper and Rotor Removed
The caliper and the rotor have been removed. If you run into a rusty stuck on rotor, use some spray oil, Kroil, WD-40, PB Blaster, etc. Let it soak a bit and tap the rotor off with a heavy hammer. In some cases you can't save the rotor so don't feel shy about banging it off. Worse case is to get the torch out to heat the rotor to expand it, and likely a MAPP gas or Acetylene torch will be needed to get enough heat on the rotor. It's not the best, but it works. Remember just try to heat the rotor not the lugs or the hub. IF the rotor is loose but won't come off you have a different problem. The Emergency brake is holding it on. On the back of the rotor you will see the cable connection and the pull. You may have to move that to fully release the E-Brake,
If replacing the rear rotors you must RELEASE the Emergency Brake before pulling the rotor off.