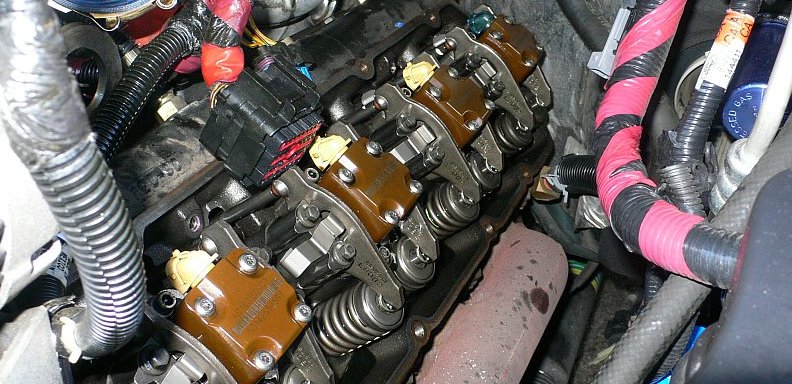
The Wrap Up


I'm sure I forgot some details on the job but, hey this is just a helpful guide to let you get a jump start on your project. Their are a few steps that you should be careful of, including making sure you don't have cylinders full of oil when you start the engine. Also making sure all the little bits and pieces get back into place as they were. I think I have a lot of it outline, but don't be surprised if I missed a step or two in the outline.
Removing Diesel Build Up
Removing Passenger Valve Cover
GTSparkplugs Header
Click for Contact Page Click for Contact Page
Valve Cover Tight Squeeze
Powerstroke Valve Cover Removal
Hose Bracket Broken
Powerstroke Hose Bracket Fixed
Powerstroke Injector Install

Blowing The Diesel Gunk Out - Important


After removing all the injectors I was cautious of oil and diesel pouring into the cylinders. The heads have no combustion chambers and the piston only has a small space so if much fluids get into the cylinder you will have a big problem. What I did was just put a clean rag in each open cup and with a large breaker bar turn the engine over. This is with the hope of no NEW oil or diesel is going to pour in (hence rags in cups). I did 2 complete revolutions and all seems well.  Towels used to keep spray from shooting up, but none really happened. Do this as a minimum or check on line for other ways to purge the cylinders if you get them loaded.

The Passenger Side Mess


The Driver side is by far the easier side, and disassembly is the same but toss in a bunch more crap, mainly hoses and the added tightness of space due to the Air Conditioner box. While it may seem impossible to remove the valve cover wihout taking off a bunch of stuff, it is possible.

Twist and Shout


After removing as much out of the way as you can, hoses,  bracket on the top of the A/C Box, wires, turbo pipes you start to wiggle and twist out the valve cover. It's a good idea to TRY to remember how you get this thing out as eventually you have to put it back.

Valve Cover Finally Out


I don't know how it came out but it did. This has to go back in so again try to remember!

Some Breakage May Occur


When pulling the bolts from the passenger side valve cover you run into these hose clamps. These need to come off before you can remove the valve cover. You need to try to pry these from the bottom, but you may not have something that can do that. So just try to pull them straight from the back. If you don't you will have what you see above.

No Replacement Part


I could not find a replacement part for the hose clamp and had to resort to some JB Weld to make it all solid. It's ugly but it strong again.

It's Glow Plug and Injector Time


After all the cups are replaced I replace the Glow Plug and Injector one cylinder at a time. The Glow Plugs get a dose of Anti-Sieze just for good measures then torque. Then injectors need to be carefully installed.

Install any cylinder head plugs at this time. If you forget you will be sorry. If O-Rings are bad replace.

I used a thick rag on the top and the lead mallet to squarely tap the injector firmly into the holes. You need to watch out for the bracket and the upper mounting bolt to make sure you get the injector bracket slid correctly over the bolt as you put the injector in. Push with your hands before LIGHTLY using the mallet (hammer). Make sure the injector is bottomed out and torque to specs.

The rear injectors are very difficult to remove on both sides of the engine, install and overall deal with. You need to take your time and walk away when you get fatigued at working hunched over in the engine compartment. Once the side is done, re-install the valve cover gasket/harness and start putting it back together. Wiring is simple, just plug things in making sure all injectors and glow plugs connectors are firmly in place. The rear bolts on the Valve cover are difficult to get to. You will have to get creative to get them started (swivel, blue tape, flexi-drive, etc), again take your time and walk away for a beer when you get sick of dropping the bolt.
Prev
Start
You can Navigate to any of the pages in this project by the BELOW drop down menu or use the NEXT or PREV links

Wrap Up


Time to start the reverse process of disassembly, just go in reverse checking to make sure you have replaced all the bolts you have in the valve cover, then work your way backwards until it's looking like an engine again. Now comes the messy part with flushing the cooling system. I used a gallon of Simple Green cleaner in the process of about 5 flushes of the cooling system. For the first time fill it up with water and a cup or so of Simple Green, the Fire It UP! The engine will take a while to crank up since oil and diesel are likely empty. The engine will run HARD AND SMOKEY until the air purges from the fuel system.

Run the motor and as they say "Rinse and Repeat" until things are looking clean. It's difficult to get the sludge out of the plastic degassing tank on the front of the radiator do the best you can or REPLACE IT. The threads on the radiator cap filler became so expanded by the diesel fuel in the cooling system that it needed to be replaced as well as the cap and most of the radiator and related hoses just to be sure. Do this before flushing if you start replacing things. Look for valve cover leaks and all the stuff that I forgot to tell you about.

This was my first time cracking the Power Stroke engine. It would have been easy except for how tight the engine compartment is, especially in the rear of the engine.

Torque Specs For A Few Things

Valve Cover Bolts -        8 ft/lbs
Injector Hold Down Bolts - 120 in/lb (10 ft/lb)
Glow Plug Torque -         14 ft/lbs