Build Your Own Roll Bar Camera Mount
Here is another simple diy project that will show you how to make a robust and simple camera mount. This mount style can be used for anything with a standard 1/4" thread mount. These are not shock resistant mounts as I have found that more of the modern non-camcorder style cameras (lipstick, contour, gopro) seem to have a better picture with a rigid mount. I have used the I/O Port racing mounts and they are well made and ones I would concider if I didn't make these to support dual cameras. Most of the parts are either scrap aluminum and some bolts, but you will need to get a ball head (yeah I know) for the mount if you want a swivel as well as the pipe clamps. Fortunately all the parts are inexpensive! At the end of the photos is a detailed parts listing.
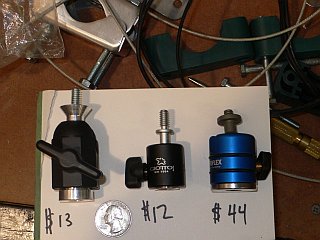
Camera Mount Ball Heads
Another shot of the 3 heads. The Panavise is very inexpensive and by the way the easiest to get. The Giottos and the Novoflex would work great and I will use them for single camera mounts. Hey,
I already have them, so it is a good excuse to get more cameras! The cost of them were - Panavise $16, Giottos $12 and Novoflex $44
Panavise wins for best all around head, low price,heavy duty, Giottos was very inexpensive, and Novoflex was the best looking, and made well.
Isolation Mounts (Pipe Clamps)
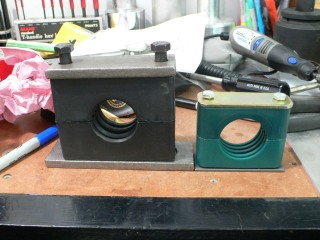
Here is a view of the Pipe Isolators (clamps) as from McMaster Carr. The Black one is the heavy duty version and is quite substantial, and the green is the standard duty that I have used also for the fire extinguisher mounts. The Heavy duty mounts come with some thick steel and larger bolts as well. The nice thing about the heavy duty version is the height is a bit taller off the bar as well as being wider which makes the mount easier for the wider base that the ball heads require. Either will work just Jim Dandy. Just make sure it's the right size for your Roll Bar.
Top and Bottom Plates
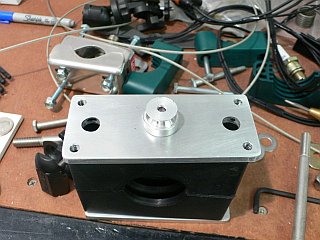
Two Aluminum plates were made out of 3/16" 6061-T6 plate, same material as the fire extinguisher mount. The bottom plate is about the same length and width as the plastic part of the mount. The top
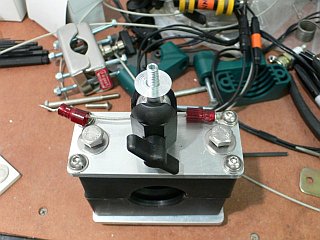
mount is a bit wider to support 4 tapped holes for cable clamps and the safety wire lock. The Panavise mount was opened and the bottom is mounted to the plate. This is done with a 1/4" counter sink allen head. PLEASE USE LOCKTITE.
One other thing you may need is a counter sink tool that is the correct size for the head of the bolt used.
Ball Head
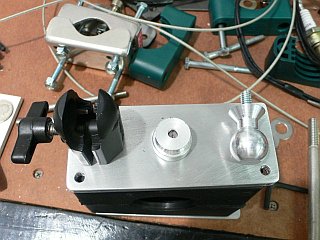
The Panavise Ball Head is all metal and very durable. It is broken apart here to see the individual components.
Camera Mount Assembly
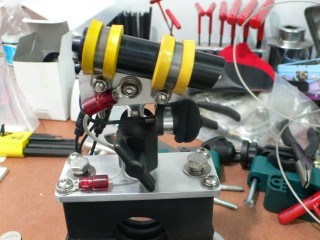
Getting the Ball Head mounted up. The 4 corners have stainless button head allen bolts which will be used for cable clamps. The one with the red connector is a safety cable that most sanctioned racing will require, just made it with some stainless cable and strong electrical crimps. Also you can see the change in bolts, I picked up some stainless bolts that were long enough to be used with locking nuts. The I/O Port fixed mount can be seen in the pile of parts in the back. It's a good mount, just not as good as mine!
Bullet Camera Mounted
Now with the cameras mounted for a trial fit. You can see the safety cable attached. The Actual video cameras were mounted on a 1" Aluminum Angle with a couple of Aircraft Adel Clamps that I had for years. McMaster has them also in Stainless and Aluminum as well as a couple of styles and sizes. One side was slotted in an arc to allow one camera to move up and down for added adjustments. The microphone is a Sony stereo condenser that I picked up from Amazon. You MUST have a foam wind screen or the audio will be unusable from wind in an open window car. The microphone will not work will if in the air stream
Camera Mount Parts Listing
Ball Head
Panavise - This is the lowest cost and most durable
ALTERNATE BALL HEADS
3249T111 - Heavy Duty Single Line Damping Vibration Clamp Weld-Mount, Zinc-Plated Steel, for 1-3/4" Tube OD
92198A642 18-8 SS Hex Head Cap Screw 3/8"-16 Thread, 4-1/2" Length
Note : 4-3/4" might be better. Also I used 3/8" diameter instead of 7/16"
to provide more room for the corner tapped holes. Check for your application
91253A542 (fastner to hold ball mount to top plate) Steel Flat Head Socket Cap Screw 1/4"-20 Thread, 1"
Note : This is for a pack of 50, you may be able to find something at a hardware store with Phillips head
Other Stuff
Various Washers and Nylocks nuts for mounts and cable clamps.
Adel Clamps (also available at McMaster Carr)
Small Angle to mount the cameras on also from Online Metals
Cameras DataToys, ChaseCam, etc.
Microphone
Installed in Car on Roll Bar
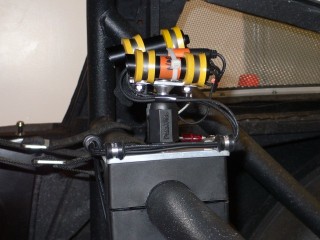
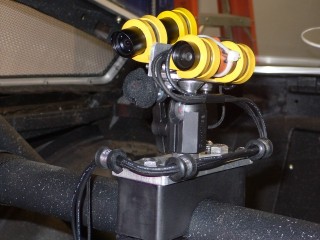
The finished project. The cable clamps are mandatory to keep cables from shaking and breaking out of the back of the bullet cameras due to wind and vibrations. The cameras are mounted to a small piece of angle aluminum that allows one camera to be pitched independently. The camera that is pointing down is the WIDE angle view, the one more level is the narrow field view. Stereo microphone is under the wide view, and wrapped with some old headphone foam to keep the wind out. The foam trick works well, and does not mess with the music of the engine but it will only help wind noise so much if direclty in the wind.
One camera is a extra wide view for in car view, the other is a front window view which is just wide enough to capture the windshield and related activity. The idea was to have split screen or be able to go from in car to out car views.

