Typical Automotive Headlamps

Headlight Relays


If you have an older car or are doing a new wiring job yourself here is a simple circuit that will give you full voltage to your headlights. In many older cars, or cars where you have replaced the headlights with higher power bulbs you run the risk of over loading the wiring as the current draw for these higher power lights can exceed the what the original harness may have been designed for.

Even if you are using stock sealed beam bulbs you will find that most auto manufacturers didn't do a good job with the wiring to the bulbs due to the long run from the light switch in conjunction with typically too small a gauge of wire. The result can be lower voltage to your headlights, which ultimately results in dim bulbs.

With a couple of parts and some thicker wire you can get the high power lights working properly. It's import to say that you should always fuse all circuits. If you are using your existing headlamp wiring they are fused and you should do the same, otherwise expect a meltdown and accompanying fireball under your hood. 

To learn more about Relays check out the Introduction to Relays page as well as the Electric Fan Wiring page as they may also help with understanding some of the basics of wiring.

Wiring Headlights and Relays


In all basic wiring jobs you need to follow some basic rules of electricity, but it's pretty easy. Here are a few key tips before we start -

  • Use the proper sized wire for your systems current draw

  • Fuses or circuit breakers must be used to keep your car (or truck) from burning to the ground in the event of a short circuit

  • Keep wires from getting into moving parts of the fan or engine.

  • Keep wires from rubbing and shorting out (see above comment on fuses)

  • Ensure all electrical connections are soild, clean and tight and dry


Some basics first, then the schematic. Let's get busy as they say...
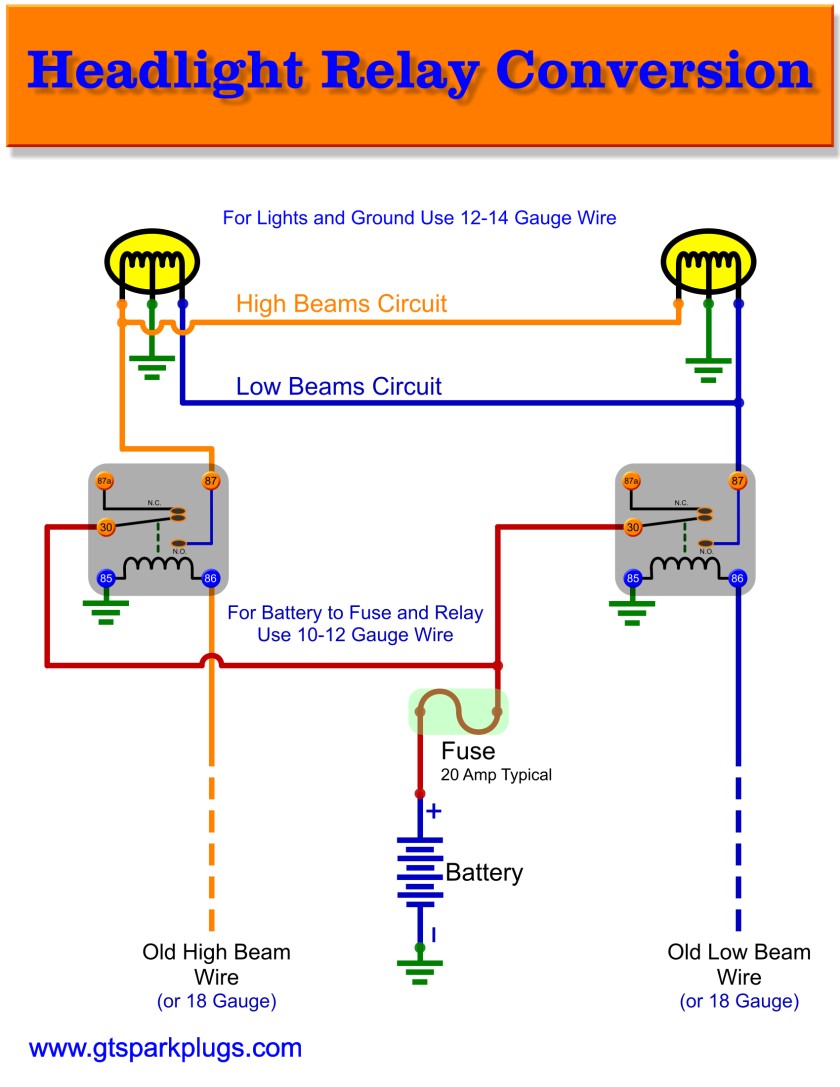
Headlight Relay Wiring Diagram

Common Automotive Headlight Relays


Above are a few of the typical relays you might use for switching headlights. They generally are the common automotive relays that you find under your hood now. Get a relay that has more capacity then expected, some relays in the same sized packages come in various current ratings so make sure you check the specification on the part.

Left Most Relay - Waterproof relay with connector. A good choice for under hood or where things may get wet

Center Relay - The common ice cube Bosch/DIN relay. Easy to get, lots of mounting options (built in mount shown)

Right Most Relay - The micro relay. These can be useful in tight spaces but make sure that you use a minimum of 20amp models.

Don't forget the socket for your relays too. Micro relays use a smaller socket then the cube. In a pinch you can use regular slide connectors for the cube relay. The micro relay uses 2 different size connectors are the smaller are less common to have. In most cases a socket is a better and cleaner way to do the installation

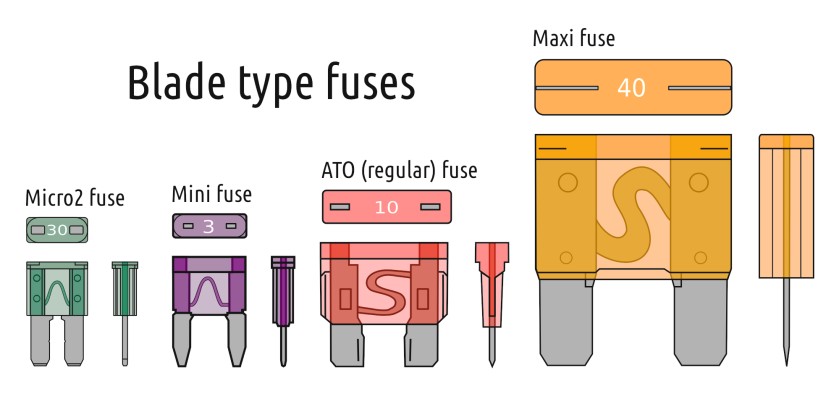
Common Automotive Headlight Fuses


Their are a bunch of different style fuses (even old school glass style). I prefer to use some of the more modern
styles. Generally I like the Maxi-Fuse size for higher current applications. They are a good choice for high power
halogen replacement bulbs. A second choice would the the common ATO blade fuses. Get a good fuse holder
with heavy gauge wire like this one I have picked up online. (Ok let me get a plug in here for Amazon - Maxi-
Fuse Holder)

Common Maxi-Fuse Color Amp Ratings


Yellow - 20 Amp
Green - 30 Amp
Orange - 40 Amp
Red - 50 Amp
Blue - 60 Amp
Brown - 70 Amp
Clear - 80 Amp
Purple - 100 Amp


Suggested Fuse Current Ratings


Find the total current draw for either the high or low beams  (generally only one is on at a time), remember that
you have 2 lights on at any one time. This will be the minimum fuse you will need, use that number and round
up to the nearest fuse available. For typical H4 halogen 100w bulbs a 20amp (yellow). The math is pretty simple
for this -

The assumptions :
Car Battery Voltage is approx. 12 Volts (not exactly but a safe number)
Each Bulb is 100W and I have 2

So how much Current is being Drawn by all 2 bulbs at 12 Volts? That's Easy, each bulb draws 8.34 Amps at 12 Volts, and I have 2
bulbs each running at 12 Volts, so that's right at 16.7Amps. Wait, how is the magic accomplished. By this simple formula -

I = P / V

Where :

I = Current in Amps
P = Power in Watts
V = Force in Volts

So each Bulb's current is calculated as follows -

Current in Amps = 100 Watts / 12 Volts
8.33 = 100/12

Now that I have 2 bulbs that's about 16.7 Amps total and that will tell me that I am going to need at least plan for a 20 amp circuit.

For more information on how to calculate all this look at the Ohms Law Calculator (it has a similar example)


Wire Capacity


While talking about fuses it's also important to ensure you use a thick enough wire for your high power
connection to the relays and bulbs. Relays take very little current, but the bulbs can use a bunch. Use the Wire
Size Calculator to get you a rough size. For the relay control 18 Gauge wire is fine, they draw only a little
current, but for the main power and headlights they need to be much thicker. For the main feed I would try to
use 10 or 12 Gauge from the battery to fuse to relays, then from each relay which should be close to the
headlights nothing smaller then 14 gauge for the shortest of runs, better would be 12 gauge. Why the extra thick
wires? Voltage drop. The thicker the wire the less drop and that's what we are after.
Automotive Headlight Fuses

Headlight Relay Wiring Diagram


The above circuit is a way to use existing headlight wiring to control 2 relays that can be placed close to the lights. The main power from the battery feeding the fuse and relays should be a nice large gauge wire as indicated. This run to the battery is typically much longer then the run from the relay to the headlights so it's gauge must be thicker. Again the thicker the wire the better. The control for the relays can come from the existing headlight wires, one for high beams and one for low beams. If a new installation the relays can be activated by some simple switches such as a turn stalk switch or a foot switch.

Again, don't forget the proper size fuse!

If you are not familliar with wiring diagrams a few things to note :
The green upside down 'christmas tree' is the GROUND. This typically will be a wire that is connected to the chassis of the vehicle. Ensure a clean rust free connection.

Some vehicles use 2 headlights instead of one on each side. If you have the 2 on each side style, the wiring is almost the same except their are 2 bulbs and one contact of each bulb will go to the ground. If you need a specific picture of it, shoot me an email by clicking the little spark plug at the very top right of the page.

Conclusion


This project is generally done on older cars with dim headlights or when replacing your old stock lamps with some high output flame throwers that draw too much current for your stock wiring to handle.

Just like James Brown said in the Blues Brothers - "Can you see the light..."

Happy motoring!
Click for Contact Page Click for Contact Page
Common Automotive Headlight Relays